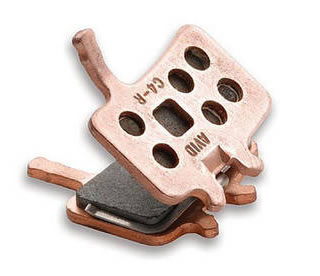
The front brakes on my Specialized Rockhopper 2009 MTB started to make a slightly unusual sound recently so I decided it was time to check and/or replace the pads. In fact, the pads were used/second-hand when fitted because they were replaced during my Chilterns cycle ride by a local shop who did an emergency repair for me!
- The front brakes on my Rockhopper bike are Avid Juicy 3.

I’ve never changed pads before so I asked my mate Brian (who knows more about these things than me) to help. Well, when I say “help”, I actually mean “do most all of the work”! Thanks Brian! Anyway, between the two of us, this is how we changed the pads.
Firstly, these are the pads and retaining clips that we bought. We probably didn’t need the retaining clip if I’m honest but when we had it, it just seemed easy to replace.
With new brake pads and clips in hand, here’s what we (Brian) did.
- With the bike upside down on its handlebars, take the front wheel off.
- Loosen the fixing bolts that hold the brake unit to the fork so that the brake unit can be moved (to give a bit more room to work and pull out the pads).
- Prise off the square retaining clip (at rear of brake unit) with the blade of a screwdriver; it should detach with minimal force.
- Use a screwdriver blade between the old pads to push the pads apart so that the calipers are pushed out; this is so that the new thicker pads will fit in step 7.
- Pull out the old pads1 and the brake spring that fits between them.
- Refit the square retaining clip.
- Assemble the new pads and brake spring and push the pads and spring between the calipers until you hear a ‘click’ when the pads/spring are held by the retaining clip. This is a bit fiddly because you need to hold the pads and spring together as you push them in.
- Put the wheel back on so that the disc sits between your new pads.
- Adjust the position of the brake unit so that the brake disc rotates freely between the pads.
- Brian’s method here was to ‘jiggle’ the brake unit to free up pads/calipers. Squeeze the brakes on and tighten the brake unit fixing bolts. Release the brakes, rotate the wheel, check that it rotates freely and there is no contact between disc and pads.
That’s it! This is how we did it, there may be better ways (and better tools) available but it worked for us. My brakes now feel and sound better. Yay!
- Avid Juicy 3 brake pads on Amazon
- Please note: This is only a guide. I hope it helps you. We’re enthusiastic amateurs so please consult your local bike shop or cycle mechanic if in doubt.
1 After checking my old pads, we found that there was some wear left in them but the pads were scored/marked.
I’m a bit confused;
You removed the retaining clip before the pads, so you must have removed it from the OUTSIDE of the brake calipers. Doesn’t this damage the clip?
You reinstalled the retaining clip before the pads, so I’m guessing you installed the clip from the INSIDE of the calipers.
You had new clips already, so it didn’t matter if you damaged the old ones; if one were planning to re-use the original clip, would it be necessary to remove the clip AFTER the pads? (Would it be necessary to remove the clip at all?)
Thanks for the post!
This was a few years ago now and we did it as described. Yes, removed old clips from outside. We had new clips but I cannot remember now if we used those or old clips. I think we did need to remove the clips.